
Cozy handheld pies, fast
If you love quick desserts that feel bakery-special, these mini apple pot pies are your new go-to. Using frozen mini pie shells and a ready-to-bake crust means you get that flaky, golden finish without spending all afternoon. The filling is warm, cinnamon-kissed apples swirled with a creamy cheesecake-like touch perfect for fall baking vibes, holiday trays, or a “just because” weeknight treat. They bake up in under an hour start to finish, and everyone gets their own adorable little pie. Save this easy dessert recipe for parties, lunchbox treats, or a last-minute sweet craving.
- Prep: 25 mins
- Cook: 25 mins
- Total: 50 mins
- Servings: 8
Ingredients
- 1 (8-count) package frozen mini pie shells in foil tins, thawed
- 1 refrigerated ready-to-bake pie crust
- 3 cups peeled apples, small-diced (about 3 medium apples)
- 2 tablespoons water
- 2 tablespoons lemon juice
- 1/3 cup brown sugar (light or dark)
- 1 1/2 teaspoons ground cinnamon
- 1 tablespoon cornstarch
- 1 (5.3-ounce) package soft cream cheese (or whipped cream cheese)
- 2 tablespoons heavy cream (optional, for extra silkiness)
- 1/2 teaspoon vanilla extract
- Pinch of salt
- 1 large egg
- 1 tablespoon water (for egg wash)
Kitchen Tools
- Sheet pan + parchment paper
- Microwave-safe bowl (or small saucepan)
- Mixing bowl + spatula
- Knife & cutting board
- 3-inch round cutter (or a glass rim)
- Pastry brush (or spoon for egg wash)
Step-by-Step Instructions
- Prep: Heat oven to 400°F (200°C). Line a sheet pan with parchment and set the thawed mini pie shells on top. Let the refrigerated pie crust sit at room temp for about 15 minutes so it rolls/cuts cleanly
- Soften apples: In a microwave-safe bowl, combine diced apples, water, lemon juice, brown sugar, cinnamon, cornstarch, and a pinch of salt. Cover and microwave on High for 4–5 minutes, stirring once, until hot and slightly saucy. (On stovetop: simmer 6–8 minutes.)
- Make it creamy: Stir in the soft cream cheese until melted and glossy. Add vanilla and (optional) heavy cream for extra smoothness. The filling should look creamy with tender apple pieces
- Fill: Spoon the warm filling evenly into the mini pie shells, leaving a small rim so the tops seal well.
- Top crusts: Cut 8 circles from the refrigerated pie crust (about 3 inches). Place one circle over each pie and crimp edges to seal. Cut two small slits (an “X”) in the center of each top.
- Egg wash: Whisk egg + 1 tablespoon water. Brush a light coat over each top crust for a shiny, golden bake.
- Bake: Bake on the center rack for 20–25 minutes, until lightly browned. Cool 5–10 minutes on a rack before lifting pies from tins.
")
Pro Tips
- Storage: Keep cooled pies in an airtight container up to 3 days. Reheat 8–10 minutes at 325°F to re-crisp.
- Subs: Swap apples for pears; add a pinch of nutmeg; or use maple syrup in place of some brown sugar.
- Meal Prep: Make filling up to 2 days ahead. Warm it slightly before filling so it spoons easily and seals better.
- Serving: Serve warm with vanilla ice cream or lightly sweetened whipped cream for a bakery-style dessert plate.
Main Body
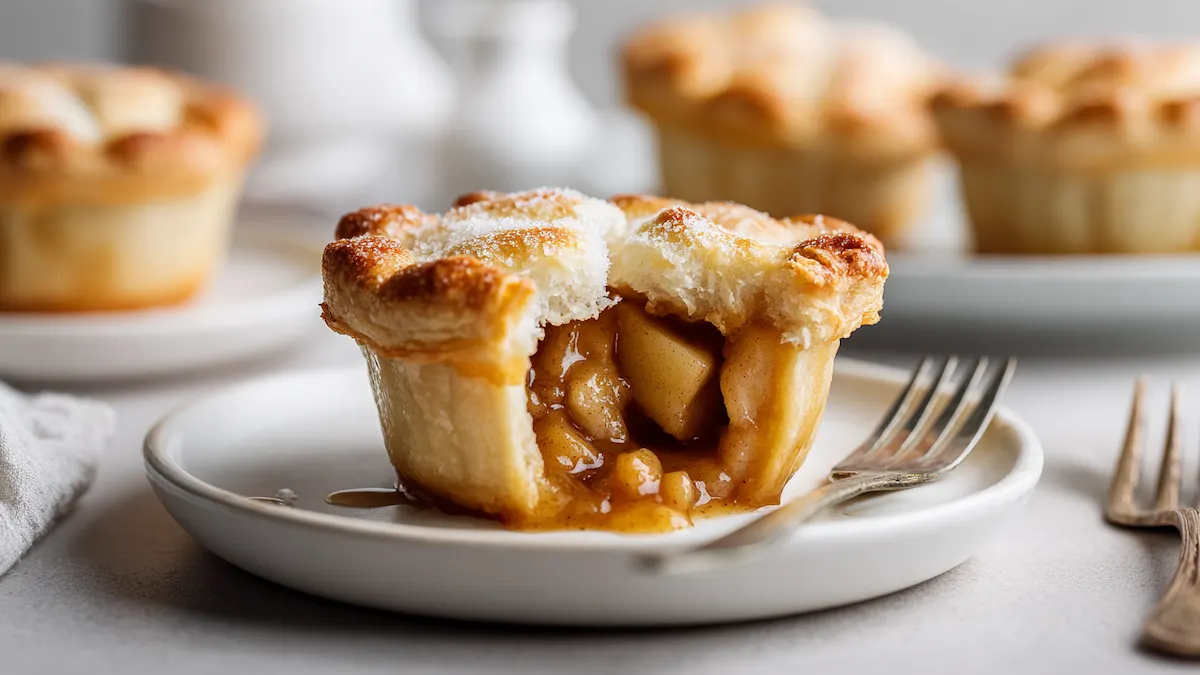
These mini apple cream cheese pot pies work because they lean on smart shortcuts while still tasting like you really “baked.” Frozen mini shells give you an instant, neat crust base, and the ready-to-bake top crust delivers that classic flaky finish. The filling is the star: apples cooked just until tender, thickened with a little cornstarch, then made creamy with soft cream cheese for a rich, almost cheesecake-like bite.
The key technique is softening the apples before baking. If you put raw apples into a mini pie, they often stay too firm and release liquid that can make the bottom soggy. A quick microwave (or short stovetop simmer) turns the apples saucy and predictable. You’ll know you’re there when the mixture looks glossy and the spoon leaves a brief trail that slowly fills back in.
Cream cheese is a simple upgrade that gives this dessert a “special occasion” vibe without extra steps. It balances the sweetness, adds a gentle tang, and makes the filling cling to the apples instead of pooling. If you want a softer, more custardy center, stir in the optional heavy cream just a couple tablespoons is enough to make the texture extra smooth.
For an easy weeknight flow, do it in this order: preheat oven, set shells on the pan, mix apple filling, then cut crust circles while the apples cook. That way, you’re always moving forward and everything stays warm and cooperative when it’s time to assemble. The egg wash is worth the 20 seconds your tops will bake up shiny and golden, like a bakery display case.
These are also perfect for entertaining because they portion themselves. Let them cool slightly so the filling sets, then lift them from the tins for a clean presentation. If you’re packing a dessert tray, bake earlier in the day and rewarm right before serving for that fresh-from-the-oven vibe.
Variation Recipes
- Caramel Apple Mini Pot Pies: Replace 2 tablespoons brown sugar with 2 tablespoons caramel sauce, and add a tiny pinch of sea salt for a salted-caramel finish.
- Berry Cheesecake Mini Pot Pies: Swap apples for 3 cups frozen mixed berries. Microwave just until thick, then fold in cream cheese and a little lemon zest.
- Cinnamon Roll Top Mini Pies: Instead of circles, cut thin strips of dough and weave a quick lattice. Brush with egg wash and sprinkle with cinnamon sugar.
Conclusion
Warm, flaky, and perfectly portioned, these mini apple cream cheese pot pies are the kind of easy dessert you’ll want to save for every busy week. They look impressive, taste cozy, and come together with simple store-bought helpers. If you try them, save the recipe to your dessert board and share them with someone who loves a quick homemade treat.
Nutrition (Estimated)
| Serving | Calories | Protein | Carbs | Fat | Fiber | Sugar |
|---|---|---|---|---|---|---|
| 1 mini pie | 410 | 6g | 46g | 22g | 3g | 20g |
Disclaimer: Estimates vary by ingredients and tools.